


Selection Guide: Fire-Rated
Fire rated expansion joints that waterproof, insulate, block sound, handle traffic and movement in a single product.
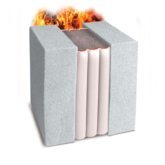
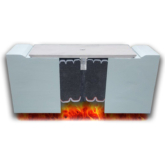
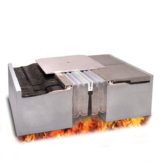
Fire-Rated Interior Wall

Description
- Watertight and fire-rated
- 1-Hour, built-in fire-rating (UL 2079)
- Seals both sides of joint
- Many industry standard colors
Details
1/2″ to 6″
(12 – 150mm)
100% Movement (+50%/-50%)

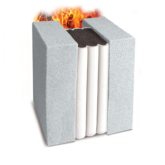
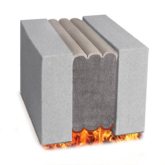
Description
- Watertight and fire rated
- 2-Hour, built-in fire-rating (UL 2079)
- Seals both sides of joint
- Many industry colors
Details
1/2″ to 6″
(12 – 150mm)
100% Movement (+50%/-50%)
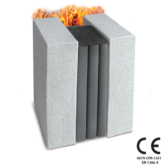
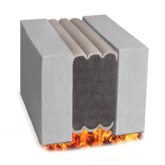
Description
- Watertight and fire rated
- 3-Hour, Built-In Fire-Rating (UL 2079)
- For concrete, concrete block or gypsum walls
- Many industry standard colors
Details
1/2″ to 6″
(12 – 150mm)
50% Movement (+25%/-25%)
Description
- Pick-resistant
- Watertight and fire rated
- 2-Hour, built-in fire-rating (UL 2079)
- Seals both sides of joint
Details
1/2″ to 6″
(12 – 150mm)
100% Movement (+50%/-50%)
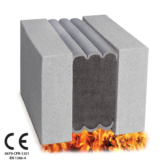
Description
- EN-1366-4 certified movement joint for EU and other markets requiring CE marking
- Vertical or Horizontal Plane Primary Seal
- Up to 4-hour fire rating
Details
12mm to 100mm
(1/2” – 4”)
100% movement (+50%/-50%)
Description
- 2-Hour, Built-in Fire Rating (UL2079)
Details
10″ to 20″
(255 – 510mm)
100% Movement
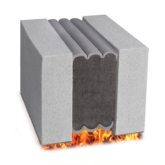
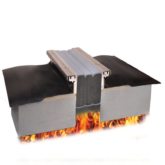
Fire-Rated Deck and Floor
Description
- 1 or 2-Hour, Built-In Fire-Rating (UL 2079)
- Integral coverplate
- “No Bump” option ensures smooth rolling surface
- “Infill” option receives flooring for aesthetic integration
- Non-invasively anchored
- Integrates into flooring
Details
2″ to 10″
(50 – 250mm)
100% Movement (+50%/-50%)
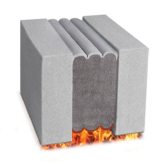
Description
- 2 -Hour, Built-In Fire-Rating (UL 2079)
Details
1/2″ to 4″
(12 – 100mm)
100% Movement (+50%/-50%)
Description
- 3-Hour, Built-In Fire-Rating (UL 2079)
Details
1/2″ to 4″
(12 – 100mm)
50% Movement (+25%/-25%)
Description
- 1 or 2-Hour, Built-In Fire-Rating (UL 2079)
- Integral coverplate
- Non-invasively anchored
Details
2″ to 10″
(50 – 250mm)
100% Movement (+50%/-50%)
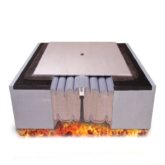
Description
- For fire-rated, split-slabs, plaza decks, podium decks
- 2-hour built-in fire-rating
- Watertight integration with deck waterproofing membrane
Details
up to 4″
(100mm)
max. mean join
100% Movement (+50%/-50%)
Description
- For split-slabs, plaza decks, podium decks
- Up to 2-hour built-in fire-rating
- Watertight integration with deck waterproofing membrane
Details
2″ to 10″
(50 – 250mm)
100% Movement (+50%/-50%)
Description
- pick resistant floor joint
- 3-hour, built-in fire-rating (UL 2079)
- non-invasively anchored
- joint face adhered
Details
1/2″ to 4″
(12 – 100mm)
50% Movement (+25%/-25%)
Description
- pick-resistant floor joint
- 2-hour, built-in fire-rating (UL 2079)
- watertight
- non-invasively anchored
- joint-face adhered
Details
1/2″ to 4″
(12 – 100mm)
100% Movement (+50%/-50%)
Description
- EN-1366-4 certified movement joint for EU and other markets requiring CE marking
- Vertical or Horizontal Plane Primary Seal
- Up to 4-hour fire rating
Details
12mm to 100mm
(1/2” – 4”)
100% movement (+50%/-50%)

Description
- 2-Hour, Built-in Fire Rating (UL2079)
Details
10″ to 20″
(255 – 510mm)
100% Movement
Fire-Rated Split Slab and Plaza Deck
Description
- For fire-rated, split-slabs, plaza decks, podium decks
- 2-hour built-in fire-rating
- Watertight integration with deck waterproofing membrane
Details
up to 4″
(100mm)
max. mean join
100% Movement (+50%/-50%)
Description
- For split-slabs, plaza decks, podium decks
- Up to 2-hour built-in fire-rating
- Watertight integration with deck waterproofing membrane
Details
2″ to 10″
(50 – 250mm)
100% Movement (+50%/-50%)
Fire Rated Tunnels
Description
- For fire-rated tunnel linings
- RWS compliant
- Up to 2 hour built-in fire rating
Details
1/2″ to 4″ | 6 – 100mm
100% Movement (+50%/-50%)